Tuesday, July 19, 2011
My little sister is able to browse the web while at work, and more often than not she comes back with a list of crafts. Here is one I could not resist:
CUPCAKE FRAME:
Original found HERE
Now here is my version
I went to the dollar store and found a frame then I brought it home and painted it. I did a blue tone under then the cream, then I sanded it so just a bit of the blue came through. I then found a paper, mine is white with some gray. 
Then I decided to go and buy a cupcake punch, but I could have also used my cricut. And then I found paper I liked and punched out the cupcakes. Then I used pop-up glue dots and put the cupcakes on the paper. Here is my finished project. Now I just need a kitchen of my own to put it in :)

And a closer up of the cupcakes.
It was SO much fun. Now onto another project ;)
Thursday, March 3, 2011
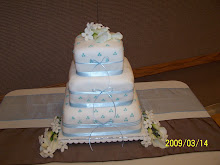
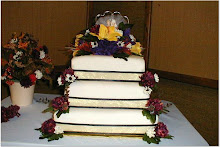
I have a question for any who might read this blog. How much would you pay for this nativity??
It is not very tall, only between 2 and 3 inches, but they are each hand made and molded then cooked.
Look below for more detailed pictures
3 Wisemen
2 Shephards with one holding a lamb & the angel
Joseph, Jesus and Mary
Cow, donkey, pig and sheep
3 camels
Okay, so now that you have seen the pictures, what would you be willing to pay for the whole set? Would you be interested in just buying Mary, Joseph and Jesus? Realize that the price to make them will influence what the price is, but if you were to see this whole set for $50 would you be willing to buy it or would you just pass it up? Do you think that is not enough? This price would probably also include a box/tin to hold the nativity in. So anyway, that is my question, and I would LOVE to hear your answers.
Monday, February 7, 2011
I look for ideas for cards on google. I found this site and found this card I really wanted to make
So I improvised and made it this way........
I start with a 8 1/2" by 11" piece of card stock (I just buy mine at Wal-Mart). I cut it in half so it measures 8 1/2" by 5 1/2"
then I fold it in half to that it measures 5 1/2" by 4 1/4"
I found coordinating paper, I have one patterned and the rest solids, that I wanted for this card.
Now to cut out the other papers
back ground colored paper 5 1/4" x 4", glue on as centered as possible
cut next color 3 3/4" x 3 1/2" and 3 3/4" x 1 1/4"
then cut patterned paper 3 1/2" x 3 1/4" and 3 1/2" x 1"
glue the patterned paper on the solid paper mentioned above
once those are glued together, glue them to the card as pictured
cut another coordinating color 2" x 3 3/4"
cut another coordinating color 1 3/4" x 3 1/2" (I emboss this one with my cuttlebug)
(for anyone interested, this is a cuttlebug, you can buy it at most craft stores, and then you will need to buy mats, embossing folders, and die cutters)
glue the embossed paper to the other one as pictured
glue to card
cut another coordinating color 1 1/2" x 1 1/2"
then pick your last coordinating paper and cut it 1 1/4" x 1 1/4"
now glue this to the previous mentioned 1 1/2" x 1 1/2" paper
glue the squares to the card
now I use my cuttlebug to cut out a 4 and a U
I then glue these on the smallest squares
I also use my cuttlebug to cut out some flowers with the coordinating colors and assemble as shown (here are what the flower die cuts look like that I used)
Here are some flowers cut before assembled
Here are the flowers assembled, I just did what I thought looked good and would stand out against the other paper it would be on.
I then glue on the flowers and you have your card

Now I thought while I was doing it I would go for it and made a bunch (7 total). Here are the other ones


If you have any questions let me know, but I hope and think I covered it pretty good. If you are wondering I used American Crafts paper for most the cards. The paper was double sided to help coordinate all the colors.
Tuesday, January 18, 2011
I had the pictures uploaded then had to stop and forgot to come back to do this post. OOPS! Oh well. So here it is
I had this fabric and cut them into stripes about 2 1/2 inches by 11 inches. If they were not exactly that it still worked out. In fact to have them anywhere from 10 to 11 inches long looked just as good and once I had them on I could not tell. I had 4 different fabrics at 1 yard each. (I did not use it all, and am not sure what to do with my left over stripes.


The below picture is the order I put them on.
I got a wire hanger, because I could not find a Styrofoam heart that I wanted to use, and did not want to continue to look or pay too much for this wreath. I just used my hands and made the hanger into a circle. Then I took my first stripe of fabric and tied it on. I continued all the way around. Here is a picture (not a good one) of what I mean.
I went all the way around and was able to finish with the last piece of fabric so there was the same amount of each on the wreath. Then I "fluffed" the wreath and it turned out like this.....
I am unsure if I like the "hook" left out or if I will end up covering it. Right now, I am going to leave it. I do like the way it turned out, and am glad I made it. Now just to work on the couple of other Valentines crafts I want to, and hopefully get them done before the big day!
Monday, January 3, 2011
I have been a busy beaver working on gifts and just some fun stuff I wanted to do. I did not get it all done, but here is what I did get done.
I made a bag and filled it with "coal" (Black licorice) for my dad. That is "all" he got in his stocking. We finally gave him the rest of his present(s). He got a HUGE box with a trio of western movies and a little silver box with a clue as to where he had to go to find the rest of his gifts. :) I am SO mean. There were only 4 clues. While he was searching around for the clues I hurried and put the rest of his gifts under the tree! What a meanie, but it was fun!
I etched some plates and cups and gave one to a cousin, and kept one for us. I have a couple more, but hey I have plans for them. I put some packets of hot chocolate in the cup and some kisses around on the plate and tied some cellophane up around them. I think it turned out cute, and I hope they enjoy the new tradition of putting the treats for Santa out on the plate and a drink to help wash it all down!


The I made a couple of these word trees. I still have not given them to who I am going to. (I am REALLY SLOW) I also made one for me! I LOVE the way it turned out. 

Then I decided with baby #4 coming I need to make a couple of things. So I got some material and filling-pictured below
and made this
Now I have a nursing pillow/boppy. I am SO excited. Everyone who has one says they are the best but I just could not make myself pay for one. This cost me less than $10 to make!!! YEAH!
Then I saw this cute material
and so I made this

I made the pockets so I can put some diapers and wipes in a section and still have a couple of pockets for my stuff. I figured with baby coming, Ryan would still need the diaper bag in-case Aleana needs a diaper change and I am in dealing with baby. So now I won't have to worry and will have a cute bag for the baby's stuff and some stuff for me.
Then my little sister showed me this adorable wreath.
I HAD to make it. All you need is a wire hanger and some NON-zip lock sandwich bags. I just need to find an awesome ribbon for a bow. Check HERE for how to make it.
I did not finish THESE so that will be my never ending project this year. I really want them done by next Christmas so I can use them!
My little sister and I were going to make THESE but my dad's saw broke so we will put them on the to-do list for making this year for Christmas. Just maybe this summer we will finally have all our cute Christmas decorations ready for the 2011 Christmas season.
I have a lot more I will be working on and hope to have some done by the end of the month so check back later :)