Tuesday, July 14, 2009
Hamburgers and Fries. Here's what you do. make some yellow or white cake and put in muffin tins. I used paper cups. Once cooked and cooled take the cups off and cut in half.
Make a batch of brownies. Once cooked and cooled use a small round cookie cutter to cut out the "burgers".


Now time to make frosting. I use my trusty buttercream frosting. You can use the store bought stuff if you want. Just get white and color it yellow, red and green. If you want to make the buttercream here is the recipe:

the "ketchup"

then the "lettuce" and put the top on.

If you want you can dab the top with water and put sesame seeds on for the real affect.


Now you want to pull every other off like this picture or you will end up with a big glob. Sprinkle with sugar for the "salt".

After they are cooked and still warm put more sugar on. And here are my fries :P

Now for how to Display/present. See below for a couple of ways of how I did it.


Now eat :q Yum... any questions please let me know.
Take 8 blocks. I got mine at The Wood Connection. I think they are 2" square. Paint them whatever color you want. I painted mine white then did cream on top of that.


Then you put the letters on. Now the great thing about this you can get 16 sayings out of this great project. Here ya go.


I had 1 1/2 yards, but did not need that much, of the striped and 1 yard of the flowered. I cut off the extra 1/2 yard and cut stripes out. Pinned inside out and sewed, then turned them right side out and stitched up the ends. I figured out where I wanted them on the flowered fabric then sewed them on. I then put velcro on to attach to the carseat. I might put flowers or bows on later, I have not decided yet. Then after that was all done, I pinned the flowered and striped fabric together, stitched it together and there you have it. I hope my description makes sense. If not you know what to do :)
Tuesday, June 23, 2009
I made fun Father's Day gifts. This is how you make them. First you need Mod Podge, since I am going to be making a lot of stuff that needs mod podge, I got a big one. 
Then you need whatever you are going to put it on. I got this board at Roberts for less than $10. I think it was around $7 original and I got it on sale :D
Then I painted the edges, since they woud not be covered by paper. I painted them brown, but you can do whatever color. Also as you see there are blocks that I did that are black, so you can do whatever you want.

The first thing I did after the paint was dry was put a layer of mod podge down and put the paper I had picked and cut down to sized on. Since it was a longer board I had to cut two papers to cover the whole thing. (See pictures for help.)

I then put mod podge over the first paper so that the second would stay on since they over-lapped. Then cover the whole thing with mod podge.

Since I was doing multiple layers I put the next layer on while the mod podge was still wet.
I cut out the letters the kids are holding out of paper using my CRICUT. Then I took their picture (I actually took a lot and chose the one I liked best). Then I printed the pictures out on regular card stock I had bought at Walmart. I then cut them down to size, these ones are about 4" x 6". Once the mod podge was dry, I then put more on top of the pictures to seal them in. This first picture is of the mod podge just applied, it will be had to see the pictures, but as the mod podge dried it will become clear.

I applied a couple of coats of the mod podge to make sure it would be sealed good :)

As the mod podge begins to dry you can see more clearly what you put on.

And this is all but dry.

And now dry and ready to be wrapped. :D

Here is the second one I did. Since I did not have everyone there to hold a letter I just took pictures and cut out Grandpa with the cricut. I did the same thing as the first one, but instead of putting the pictures with the kids holding the letters on, I put the letters on to spell grandpa, then mod podged, then put the pictures on in spots that were "open" and let the mod podge dry, then put another layer of mod podge on to cover everything. I also did a couple of coats of mod podge on this one.

Still wet

Almost dry

And finished and ready to be wrapped.

The Grandpas LOVED them. If you don't have enough kids to hold the letters you can just do the second one, or if you have too many kids to spell grandpa you can spell grandfather, or any other word that you want that will work. You can also do this for DAD, Daddy, father, etc. or even Grandma. I did my own assortment for Dad. Instead of putting it on one piece I put them on three different blocks. This way they are like picture frames. See below for pictures. I did it the same way, painted the blocks, mod podged once paint was dry, put picture down, then once the mod podge was dry I put a couple of coats of mod podge over everything to seal it all.


Tuesday, June 16, 2009
I have had a few projects, with Father's Day and a few other things. I can't post about them, but thought I would let all who check up on me know that I have been doing stuff. After Father's Day and another event I will post about what I have been doing. Check back next week. :)
Monday, June 8, 2009
So I did two cakes here recently. A friends sister and my sister. Plus we "catered" my sisters. Here are the cakes and truffles. Plus I decided to "play".
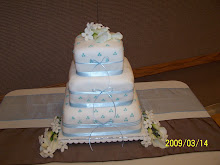
Here is Naomi's cake. It turned out really good.


These are Brownie bites that we made for the wedding.


Yummy cookie dough balls ready for dipping.

Cookie dough balls after they were dipped.

I decided to make this yummy parfait. It is good. I have whip cream, crushed graham crackers and the mousse. I then threw some mini semi-sweet chocolate chips on top. I think it would have been TONS better with brownies instead of the graham crackers. But oh well, I can do it next time :P

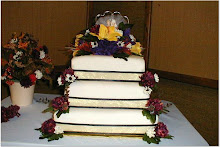
Now here is my sister Nicole's cake.


It all turned out really well. But I am glad I am done, and have a break for awhile.
Saturday, May 30, 2009
I have had a lot to do, and this next week will be just as busy. I helped Nicole with her wedding invitations, the wax seals took ALL day to do. But they got done. Then there was the endowments, that were in Saint George, so we headed there and enjoyed a quick trip. This last week has been another wedding cake, I will have to try to post pictures tomorrow (Sunday) cause then we start on Nicole's cake and then the truffles and all the other last minute details. :) YEAH we are so excited for then upcoming wedding of Nicole and Ben, even if it means our week will be BUSY! Stay tuned for pictures of all the fun we have been doing.
Saturday, May 2, 2009
Here are some pictures of the cake I just did. It turned out great and the bride and groom loved it! Yeah!