Wednesday, December 2, 2009
I have a couple of HUGE Christmas projects I am working on. I am hoping to get them ALL done by this weekend. So stay tuned for pictures that should come next week.
Wednesday, October 21, 2009
I LOVE FALL so I decided a couple of years ago that I need some Fall decor. I made these cute pumpkins out of Polymer Clay.
Plus I made this witch.
Last year I went and found these glass pumpkin jars. My mom and I thought putting the orange tissue paper in there would be cute. Of course I did not have enough so I put white in the one.
This year I made/painted a bunch of things. I did the vinyl lettering stuff with my Cricut :) I had so much fun. I found that using the Cricut Design Studio is SO much easier when doing vinyl.


I got the wood blocks and other shapes HERE. They have SO much more I want to go get. So when I finally have money I will slowly get more stuff.
Then I bought a clipboard at walmart and made this Halloween count down. It did not totally turn out the way I wanted, but is still super cute!
Thursday, October 1, 2009
In my family we LOVE s'mores, and have found a great recipe so that we can have them without the fire.
1/2 cup margarine
1/2 cup brown sugar
1 cup flour
1/2 cup graham cracker crumbs
2 cups mini marshmallows
6 oz pkg chocolate chips
Beat margarine and sugar. Add flour and crumbs. Mix. Press into 9 inch pan. Sprinkle with other ingredients. Bake in 375 oven for 15-20 minutes. Cool and cut into bars.
We ALWAYS make a double batch to fit in a cookie sheet. We also usually use MORE chocolate chips and marshmallows than called for. I usually use 2 12 oz bags of chocolate chips and almost a full bag of marshmallows. (you can use as much or little as you want)
Monday, September 28, 2009
On Saturday we had a party and I made Chocolate crinkles. They are SO good. I am not sure how many know how to make so here ya go
1 1/2 cups sugar
1/2 cup oil
4-1 oz squares of unsweetened chocolate, melted and cooled
2 teaspoons vanilla
3 eggs
2 cups flour
2 teaspoons baking powder
Combine Sugar, oil, melted chocolate, and vanilla. Beat in eggs. Stir in flour and baking powder. Cover and Chill. About 1 tablespoon for each cookie. Roll in powdered sugar. Bake on a greased cookie sheet in a 375 degree oven ofr 8-12 minutes. While warm roll in powdered sugar.
Now I am bad and did not cover and chill and they still turned out good. I also didn't roll in powdered sugar again after they were done cooking. They had plenty of powdered sugar on so I did not worry about it. They were gobbled up and were gone. I also used a scoop to portion them evenly.
Friday, September 25, 2009
I have a pretty big project I am working on along with a bunch of little ones. I have some pictures somewhere I will need to upload and post, so stay tuned :)
Wednesday, September 9, 2009
So I made peach jam for the first time. Well come to think of it, this is the first time I have made jam all by myself :)
It is actually really easy. Lucky for me my mom has an Uncle that has a peach tree. So she went and got a box FULL. So I made 2 batches of freezer jam. I am planning on making some cooked jam later today.
I just used the instructions in the pecton box. We used MCP pecton.
You need 3 1/4 cups of cut up/mashed peaches. I went ahead and used a potato masher to mash mine, but still had chuncks of peaches. You add 1/4 cup lemon and stir together. Then add the pecton. Mix it until the pecton is disolved. Then let it sit for 30 minutes, stirring every about 5 minutes. After the 30 minutes add 1 cup light karo syrup and once that is stirred in add 4 1/2 cups of sugar. Slowly add the sugar while stirring. Now this is where we do it a little different, we put the mixture on low heat. This helps dissolve the sugar a little faster. But you don't have to do it this way. You just have to keep stirring until the sugar is totally dissolved . Then put it in the jars. I got about 4 per batch, ( I made 2 batches) with a little extra to make the partial jar. Let sit 24 hours on a counter until set and put in freezer.
Now is that not easy or what? of course it is a little time consuming but SO worth it. We also put the peaches in a warm water bath for about 5 minutes to help peel them. (It is SO much faster and easier). Now I am just going to make some cooked peach jam either tonight or tomorrow.
Tuesday, August 25, 2009
One of my dearest friends from working at Clear Creek had a baby shower this last Saturday. My sister and I went in on a gift. Here is what we did. I made the carseat cover/nursing blanket. Here are the pictures

This one is blurry, sorry.
Then I made a matching wipee case.

I still had fabric so I made a diapee.

I loved the way they turned out. They are so easy to make, and there was NO pattern. I just improvised. If anyone is interested in knowing how to make them, or wants me to make them one, (You can pay me or get me the matterial you want and I will make for FREE:) )let me know.
My next creation was redoing my glider. I recieved this free before moving back here from Virginia. It was a little worn out and I thought I would redo it. While still in Virginia, I did the blue cover, (don't judge it, It was HAND sewn).
Here is the glider without any cushions.
Here is the foot rest, the original (no redo)
and the bottom cushion
Here is the foot rest after first redo, (this is actually just before I took it all apart to do the newest redo. As you can see there is stains, as for the reason I wanted to redo again)
here is the bottom cushion with the first redo. Same as the foot rest, there are stains.
and the back cushion in the first redo. It was too big and looked funny, but hey for hand sewing I think it was not too bad.
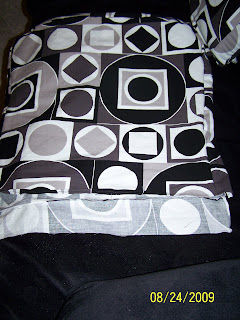
Here is the new cover. This is sewn together ready to do the finishing touches. All I did was take the cushions and trace on the "wrong" side of the fabric for my "pattern". I then made 3 inch stripes and sewed it together. 
I decided, with help from Nicole, that I was going to velcro it shut so that I could take the cover off and WASH it if stuff got on it. Here I am sewing the velcro on.
the velcro sewed on
I used the old green cushion then added some batting into the new cushion for more fluff, also with having velcro I can stuff/refluff when it starts to get flat :D
Here it is half way velcroed shut. Not too bad.
Now it is shut and you are looking at the bottom of the back cushion. 
Then I took some material and stapled it to the foot stool. I did add more batting on the foot stool too. I had just nailed the blue material, but it came out. My dad had a staple gun and so I had him help me.
Here is the glider with the cushions back on! LOVE IT!! It is nice and fluffy, and looks so much better than the blue that I had, especially since the blue had a lot of stains. It also gives some spunk to the chair. I had left over material so I am going to make a couple of pillows to go on my black couch/loveseat and chair. 
Labels: carseat cover, glider redo
Tuesday, July 14, 2009
Hamburgers and Fries. Here's what you do. make some yellow or white cake and put in muffin tins. I used paper cups. Once cooked and cooled take the cups off and cut in half.
Make a batch of brownies. Once cooked and cooled use a small round cookie cutter to cut out the "burgers".


Now time to make frosting. I use my trusty buttercream frosting. You can use the store bought stuff if you want. Just get white and color it yellow, red and green. If you want to make the buttercream here is the recipe:

the "ketchup"

then the "lettuce" and put the top on.

If you want you can dab the top with water and put sesame seeds on for the real affect.

Now you want to pull every other off like this picture or you will end up with a big glob. Sprinkle with sugar for the "salt".

After they are cooked and still warm put more sugar on. And here are my fries :P

Now for how to Display/present. See below for a couple of ways of how I did it.


Take 8 blocks. I got mine at The Wood Connection. I think they are 2" square. Paint them whatever color you want. I painted mine white then did cream on top of that.


Then you put the letters on. Now the great thing about this you can get 16 sayings out of this great project. Here ya go.


I had 1 1/2 yards, but did not need that much, of the striped and 1 yard of the flowered. I cut off the extra 1/2 yard and cut stripes out. Pinned inside out and sewed, then turned them right side out and stitched up the ends. I figured out where I wanted them on the flowered fabric then sewed them on. I then put velcro on to attach to the carseat. I might put flowers or bows on later, I have not decided yet. Then after that was all done, I pinned the flowered and striped fabric together, stitched it together and there you have it. I hope my description makes sense. If not you know what to do :)
Labels: 4th of july, carseat cover, decor, fries, hamburgers


